
Web Viewers for 3D CAD: Three.js Integration Strategies
Engineering teams have long struggled with a fundamental problem: how do you share CAD models with stakeholders who don’t have (or don’t want) expensive desktop CAD software? Design reviews happen in conference rooms with projectors, procurement teams need to verify part specifications, and manufacturing partners require visual confirmation before tooling begins. The answer increasingly lies in the browser.
Three.js has emerged as the dominant solution for web-based 3D visualization, powering everything from product configurators to architectural walkthroughs. But CAD models present unique challenges that typical 3D web content doesn’t face: complex geometry with millions of triangles, precise dimensional requirements, and file formats designed for manufacturing rather than rendering.
This article explores strategies for building production-ready CAD viewers with Three.js, covering format selection, scene optimization, and progressive loading techniques that make large engineering models accessible in any modern browser.
Understanding CAD file formats for the web
Before writing any code, you need to understand what you’re working with. CAD models come in formats that serve different purposes, and choosing the right one for web delivery involves tradeoffs between fidelity, file size, and browser support.
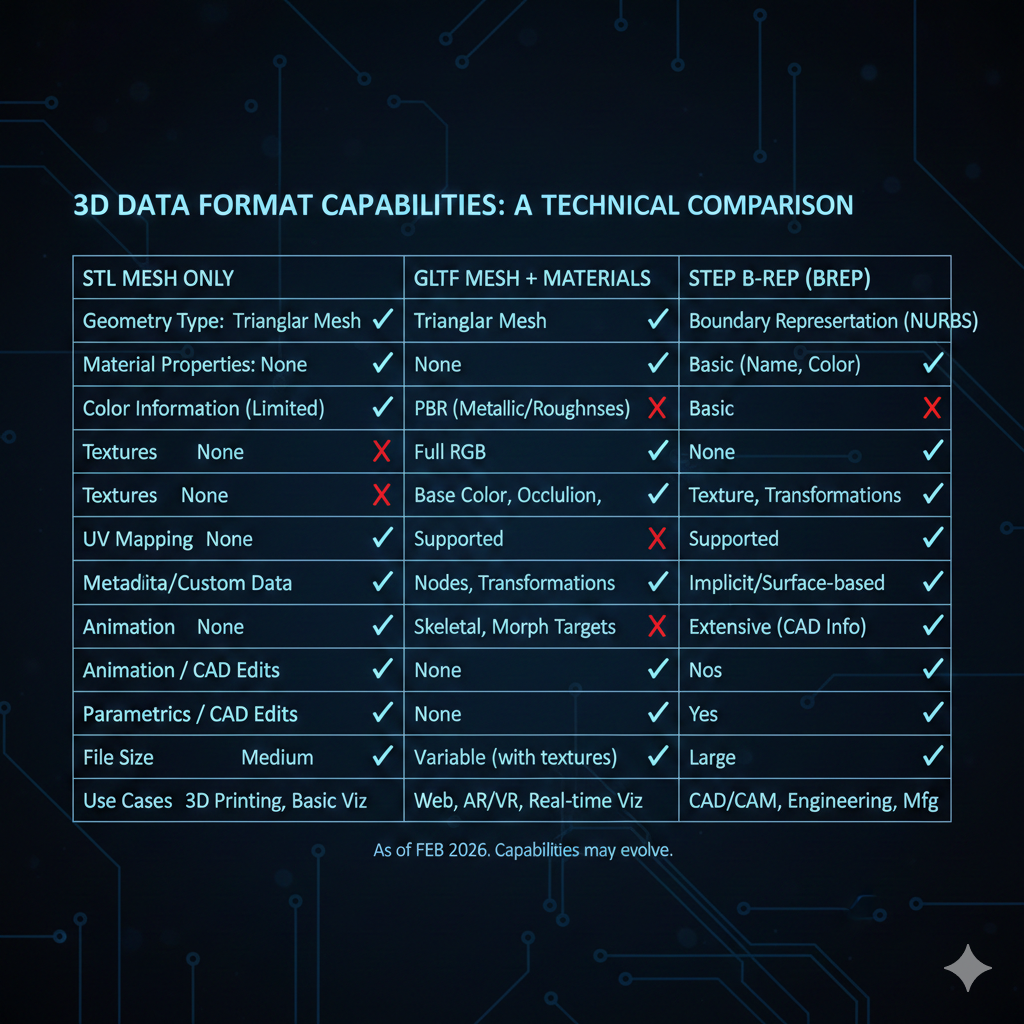
| Format | Type | File Size | Browser Support | Preserves |
|---|---|---|---|---|
| STL | Mesh | Large | Native | Geometry only |
| glTF/GLB | Mesh | Compact | Native | Geometry, materials, animations |
| STEP | B-rep | Medium | Via opencascade.js | Exact geometry, features |
| OBJ | Mesh | Large | Native | Geometry, basic materials |
STL (Stereolithography) is the simplest format - just triangulated surfaces with no color, material, or assembly information. It’s universally supported but produces large files for complex parts. A typical drone frame might be 2MB in STEP but 15MB as a high-resolution STL.
glTF (GL Transmission Format) is the “JPEG of 3D” - designed specifically for web delivery. It supports materials, textures, and animations in a compact binary format (GLB). DRACO compression can reduce mesh sizes by 90%. The catch: you need to convert from CAD formats first, which means a build pipeline.
STEP (Standard for the Exchange of Product Data) preserves the actual B-rep (boundary representation) geometry that CAD systems use internally. With opencascade.js, you can parse STEP files directly in the browser and tessellate them on demand. This is powerful but computationally expensive.
💡 Pro Tip: For most production applications, convert STEP to glTF during build time rather than parsing STEP in the browser. Reserve browser-side STEP parsing for applications where users upload arbitrary CAD files.
Basic Three.js scene setup for CAD viewing
A CAD viewer has different requirements than a game or artistic visualization. Engineering models need precise, even lighting that reveals surface details without dramatic shadows. Here’s a foundation that works well for mechanical parts:
import * as THREE from 'three';import { OrbitControls } from 'three/addons/controls/OrbitControls.js';
export function createCADViewer(container: HTMLElement) {  // Scene with neutral background  const scene = new THREE.Scene();  scene.background = new THREE.Color(0x1a1a2e);
  // Camera with appropriate near/far for engineering scale (millimeters)  const camera = new THREE.PerspectiveCamera(    45,    container.clientWidth / container.clientHeight,    0.1,    10000  );  camera.position.set(100, 100, 100);
  // Renderer with antialiasing for clean edges  const renderer = new THREE.WebGLRenderer({    antialias: true,    alpha: true,  });  renderer.setSize(container.clientWidth, container.clientHeight);  renderer.setPixelRatio(Math.min(window.devicePixelRatio, 2));  renderer.outputColorSpace = THREE.SRGBColorSpace;  container.appendChild(renderer.domElement);
  // CAD-appropriate lighting setup  setupCADLighting(scene);
  // Orbit controls for inspection  const controls = new OrbitControls(camera, renderer.domElement);  controls.enableDamping = true;  controls.dampingFactor = 0.05;  controls.screenSpacePanning = true;  controls.minDistance = 10;  controls.maxDistance = 5000;
  // Animation loop  function animate() {    requestAnimationFrame(animate);    controls.update();    renderer.render(scene, camera);  }  animate();
  // Handle resize  window.addEventListener('resize', () => {    camera.aspect = container.clientWidth / container.clientHeight;    camera.updateProjectionMatrix();    renderer.setSize(container.clientWidth, container.clientHeight);  });
  return { scene, camera, renderer, controls };}
The key differences from typical Three.js setups:
- Extended far plane (10000) accommodates large assemblies measured in millimeters
- Limited pixel ratio prevents performance issues on high-DPI displays
- Screen space panning feels more natural for CAD inspection than orbit-centered panning
CAD-optimized lighting configuration
Dramatic lighting ruins CAD visualization. You need even illumination that reveals surface geometry without harsh shadows or blown-out highlights. This three-point lighting setup with ambient fill works well for most mechanical parts:
function setupCADLighting(scene: THREE.Scene) {  // Ambient light provides base illumination (prevents pure black shadows)  const ambient = new THREE.AmbientLight(0xffffff, 0.4);  scene.add(ambient);
  // Key light - primary illumination from upper front  const keyLight = new THREE.DirectionalLight(0xffffff, 0.8);  keyLight.position.set(50, 100, 50);  scene.add(keyLight);
  // Fill light - softer, opposite side to reduce contrast  const fillLight = new THREE.DirectionalLight(0xffffff, 0.4);  fillLight.position.set(-50, 50, -50);  scene.add(fillLight);
  // Rim light - highlights edges from behind  const rimLight = new THREE.DirectionalLight(0xffffff, 0.3);  rimLight.position.set(0, -50, -100);  scene.add(rimLight);
  // Optional: hemisphere light for subtle sky/ground variation  const hemiLight = new THREE.HemisphereLight(0xffffff, 0x444444, 0.3);  scene.add(hemiLight);}
For metallic parts like machined aluminum or steel, add an environment map for realistic reflections:
import { RGBELoader } from 'three/addons/loaders/RGBELoader.js';
async function addEnvironmentMap(scene: THREE.Scene, renderer: THREE.WebGLRenderer) {  const pmremGenerator = new THREE.PMREMGenerator(renderer);  pmremGenerator.compileEquirectangularShader();
  const rgbeLoader = new RGBELoader();  const hdrTexture = await rgbeLoader.loadAsync('/textures/studio_small.hdr');
  const envMap = pmremGenerator.fromEquirectangular(hdrTexture).texture;  scene.environment = envMap;
  hdrTexture.dispose();  pmremGenerator.dispose();}
Loading STL files with proper materials
STL files contain only geometry - no color or material information. You need to apply materials that make the model readable and visually appealing:
import { STLLoader } from 'three/addons/loaders/STLLoader.js';
interface STLLoadOptions {  color?: number;  metalness?: number;  roughness?: number;  wireframe?: boolean;}
export async function loadSTL(  url: string,  options: STLLoadOptions = {}): Promise<THREE.Mesh> {  const {    color = 0x4a90d9,      // Engineering blue    metalness = 0.3,    roughness = 0.6,    wireframe = false,  } = options;
  const loader = new STLLoader();  const geometry = await loader.loadAsync(url);
  // Compute vertex normals for smooth shading  geometry.computeVertexNormals();
  // Center the geometry at origin  geometry.computeBoundingBox();  const center = new THREE.Vector3();  geometry.boundingBox!.getCenter(center);  geometry.translate(-center.x, -center.y, -center.z);
  // Create material with CAD-friendly appearance  const material = new THREE.MeshStandardMaterial({    color,    metalness,    roughness,    wireframe,    side: THREE.DoubleSide, // Render both faces (handles inverted normals)  });
  const mesh = new THREE.Mesh(geometry, material);  mesh.castShadow = true;  mesh.receiveShadow = true;
  return mesh;}
📝 Note: Always use
DoubleSiderendering for STL files. CAD exports frequently have inconsistent face winding, and missing back faces create confusing visual artifacts.
Loading glTF with DRACO compression
glTF is the preferred format for production CAD viewers. The binary GLB variant with DRACO compression can reduce file sizes by 10x compared to STL:
import { GLTFLoader } from 'three/addons/loaders/GLTFLoader.js';import { DRACOLoader } from 'three/addons/loaders/DRACOLoader.js';
let dracoLoader: DRACOLoader | null = null;
function getDRACOLoader(): DRACOLoader {  if (!dracoLoader) {    dracoLoader = new DRACOLoader();    // Use CDN-hosted decoder for smaller bundle size    dracoLoader.setDecoderPath('https://www.gstatic.com/draco/versioned/decoders/1.5.6/');    dracoLoader.setDecoderConfig({ type: 'js' }); // Use JS decoder (WASM has CORS issues)  }  return dracoLoader;}
export async function loadGLTF(url: string): Promise<THREE.Group> {  const loader = new GLTFLoader();  loader.setDRACOLoader(getDRACOLoader());
  const gltf = await loader.loadAsync(url);  const model = gltf.scene;
  // Center model at origin  const box = new THREE.Box3().setFromObject(model);  const center = box.getCenter(new THREE.Vector3());  model.position.sub(center);
  // Enable shadows for all meshes  model.traverse((child) => {    if (child instanceof THREE.Mesh) {      child.castShadow = true;      child.receiveShadow = true;    }  });
  return model;}
For a build pipeline that converts STEP to compressed glTF, you can use CadQuery with the cadquery-ocp backend:
import cadquery as cqfrom OCP.RWGltf import RWGltf_CafWriterfrom OCP.TDocStd import TDocStd_Documentfrom OCP.XCAFDoc import XCAFDoc_DocumentTool
def step_to_gltf(step_path: str, gltf_path: str, binary: bool = True) -> None:    """Convert STEP file to glTF/GLB format."""    # Load STEP into CadQuery    result = cq.importers.importStep(step_path)
    # Create XCAF document for glTF export    doc = TDocStd_Document("XmlOcaf")    shape_tool = XCAFDoc_DocumentTool.ShapeTool(doc.Main())
    # Add shape to document    shape_tool.AddShape(result.val().wrapped)
    # Write glTF    writer = RWGltf_CafWriter(gltf_path, binary)    writer.Perform(doc)
    print(f"Converted {step_path} -> {gltf_path}")
Performance optimization for large models
CAD assemblies can contain millions of triangles. Without optimization, they’ll crash the browser or render at single-digit frame rates. Here are proven techniques:
1. Geometry merging
Multiple separate meshes with the same material can be merged into a single draw call:
import * as BufferGeometryUtils from 'three/addons/utils/BufferGeometryUtils.js';
function mergeGeometries(meshes: THREE.Mesh[]): THREE.Mesh { // Group meshes by material const byMaterial = new Map<THREE.Material, THREE.BufferGeometry[]>();
meshes.forEach((mesh) => { const mat = mesh.material as THREE.Material; const geom = mesh.geometry.clone();
// Apply mesh transforms to geometry geom.applyMatrix4(mesh.matrixWorld);
if (!byMaterial.has(mat)) { byMaterial.set(mat, []); } byMaterial.get(mat)!.push(geom); });
// Merge each material group const merged: THREE.Mesh[] = []; byMaterial.forEach((geometries, material) => { const mergedGeometry = BufferGeometryUtils.mergeGeometries(geometries); merged.push(new THREE.Mesh(mergedGeometry, material)); });
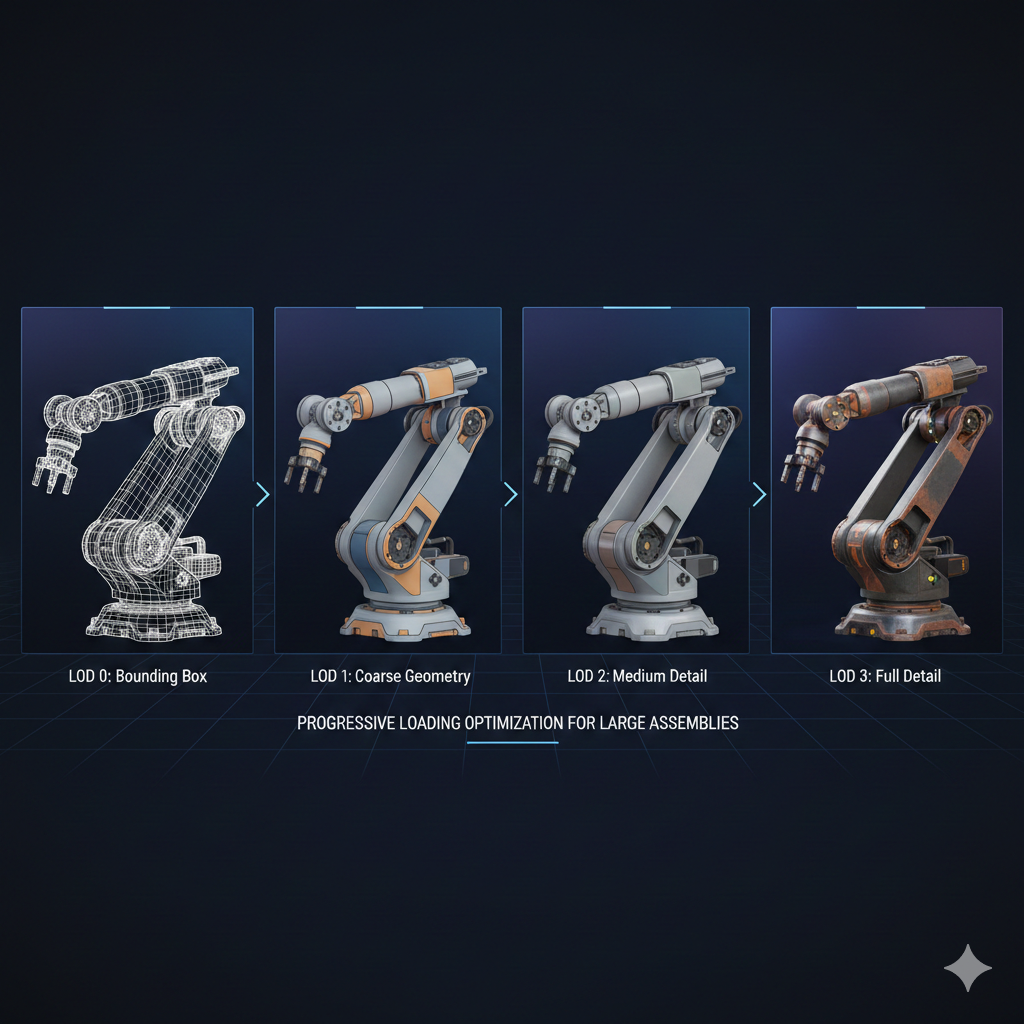
// Return as group if multiple materials const group = new THREE.Group(); merged.forEach((m) => group.add(m)); return group as unknown as THREE.Mesh;}2. Level of detail (LOD)
Load simplified versions of models based on camera distance:
interface LODLevel {  url: string;  distance: number;}
async function createLODModel(levels: LODLevel[]): Promise<THREE.LOD> {  const lod = new THREE.LOD();
  // Sort by distance (closest first)  const sorted = [...levels].sort((a, b) => a.distance - b.distance);
  for (const level of sorted) {    const model = await loadGLTF(level.url);    lod.addLevel(model, level.distance);  }
  return lod;}
// Usageconst motorLOD = await createLODModel([  { url: '/models/motor_high.glb', distance: 0 },  { url: '/models/motor_medium.glb', distance: 200 },  { url: '/models/motor_low.glb', distance: 500 },]);
3. Frustum culling and instancing
For assemblies with repeated parts (think: 100 identical fasteners), use instanced meshes:
function createInstancedFasteners(  geometry: THREE.BufferGeometry,  material: THREE.Material,  positions: THREE.Vector3[],  rotations: THREE.Euler[]): THREE.InstancedMesh {  const count = positions.length;  const instancedMesh = new THREE.InstancedMesh(geometry, material, count);
  const matrix = new THREE.Matrix4();  const quaternion = new THREE.Quaternion();  const scale = new THREE.Vector3(1, 1, 1);
  positions.forEach((position, i) => {    quaternion.setFromEuler(rotations[i]);    matrix.compose(position, quaternion, scale);    instancedMesh.setMatrixAt(i, matrix);  });
  instancedMesh.instanceMatrix.needsUpdate = true;  return instancedMesh;}
Progressive loading strategies
Users shouldn’t stare at a blank screen while a 50MB assembly downloads. Progressive loading shows content incrementally:
interface ProgressiveLoadConfig {  onProgress?: (loaded: number, total: number) => void;  onPartLoaded?: (name: string, mesh: THREE.Object3D) => void;}
async function loadAssemblyProgressive(  manifest: { name: string; url: string; priority: number }[],  scene: THREE.Scene,  config: ProgressiveLoadConfig = {}): Promise<void> {  // Sort by priority (load important parts first)  const sorted = [...manifest].sort((a, b) => a.priority - b.priority);
  let loaded = 0;  const total = sorted.length;
  // Load in batches to avoid overwhelming the browser  const batchSize = 3;
  for (let i = 0; i < sorted.length; i += batchSize) {    const batch = sorted.slice(i, i + batchSize);
    await Promise.all(      batch.map(async (part) => {        try {          const model = await loadGLTF(part.url);          model.name = part.name;          scene.add(model);
          loaded++;          config.onProgress?.(loaded, total);          config.onPartLoaded?.(part.name, model);        } catch (error) {          console.error(`Failed to load ${part.name}:`, error);          loaded++;          config.onProgress?.(loaded, total);        }      })    );  }}
// Usage with loading UIloadAssemblyProgressive(assemblyManifest, scene, {  onProgress: (loaded, total) => {    const percent = Math.round((loaded / total) * 100);    loadingBar.style.width = `${percent}%`;    loadingText.textContent = `Loading: ${percent}%`;  },  onPartLoaded: (name, mesh) => {    console.log(`Loaded: ${name}`);  },});
For very large assemblies, consider streaming geometry data:
async function* streamGeometry(  url: string): AsyncGenerator<THREE.BufferGeometry> {  const response = await fetch(url);  const reader = response.body!.getReader();
  let buffer = new Uint8Array(0);
  while (true) {    const { done, value } = await reader.read();    if (done) break;
    // Append to buffer    const newBuffer = new Uint8Array(buffer.length + value.length);    newBuffer.set(buffer);    newBuffer.set(value, buffer.length);    buffer = newBuffer;
    // Try to parse complete chunks    // (Implementation depends on your streaming format)    while (hasCompleteChunk(buffer)) {      const { geometry, remaining } = parseChunk(buffer);      buffer = remaining;      yield geometry;    }  }}
Putting it all together
Here’s a complete example combining the techniques discussed:
import * as THREE from 'three';import { OrbitControls } from 'three/addons/controls/OrbitControls.js';
export class CADViewer {  private scene: THREE.Scene;  private camera: THREE.PerspectiveCamera;  private renderer: THREE.WebGLRenderer;  private controls: OrbitControls;
  constructor(container: HTMLElement) {    // Initialize core components    this.scene = new THREE.Scene();    this.scene.background = new THREE.Color(0x1a1a2e);
    this.camera = new THREE.PerspectiveCamera(      45,      container.clientWidth / container.clientHeight,      0.1,      10000    );    this.camera.position.set(100, 100, 100);
    this.renderer = new THREE.WebGLRenderer({ antialias: true });    this.renderer.setSize(container.clientWidth, container.clientHeight);    this.renderer.setPixelRatio(Math.min(window.devicePixelRatio, 2));    container.appendChild(this.renderer.domElement);
    this.controls = new OrbitControls(this.camera, this.renderer.domElement);    this.controls.enableDamping = true;
    this.setupLighting();    this.animate();  }
  private setupLighting(): void {    this.scene.add(new THREE.AmbientLight(0xffffff, 0.4));
    const keyLight = new THREE.DirectionalLight(0xffffff, 0.8);    keyLight.position.set(50, 100, 50);    this.scene.add(keyLight);  }
  private animate = (): void => {    requestAnimationFrame(this.animate);    this.controls.update();    this.renderer.render(this.scene, this.camera);  };
  async loadModel(url: string): Promise<void> {    const ext = url.split('.').pop()?.toLowerCase();
    if (ext === 'stl') {      const mesh = await loadSTL(url);      this.scene.add(mesh);      this.fitCameraToObject(mesh);    } else if (ext === 'glb' || ext === 'gltf') {      const model = await loadGLTF(url);      this.scene.add(model);      this.fitCameraToObject(model);    }  }
  private fitCameraToObject(object: THREE.Object3D): void {    const box = new THREE.Box3().setFromObject(object);    const size = box.getSize(new THREE.Vector3()).length();    const center = box.getCenter(new THREE.Vector3());
    this.camera.position.copy(center);    this.camera.position.z += size * 1.5;    this.controls.target.copy(center);    this.controls.update();  }}
Key takeaways
Building web-based CAD viewers requires balancing fidelity, performance, and user experience:
- Choose glTF with DRACO compression for production deployments - it offers the best combination of quality and file size
- Use STL for simplicity when you only need geometry and can tolerate larger files
- Reserve STEP parsing (via opencascade.js) for applications where users upload arbitrary CAD files
- Optimize aggressively with geometry merging, LOD, and instancing for assemblies with many parts
- Load progressively to keep users engaged while large models download
- Lighting matters - CAD models need even, diffuse lighting that reveals surface geometry
The browser has become a viable platform for CAD visualization. With Three.js and the techniques described here, you can build viewers that handle everything from simple brackets to complex assemblies with thousands of parts.
Resources
- Three.js Documentation
- glTF Specification
- DRACO Compression
- opencascade.js - STEP parsing in the browser
- CadQuery Documentation - Python CAD for generating source models