
Building Your First Kubernetes Operator: From CRD to Reconciliation Loop
You’ve deployed dozens of Helm charts and written countless YAML manifests, but every time your team needs to manage a stateful application—a database cluster, a message queue, or a custom service mesh—you end up with brittle bash scripts and manual runbooks. The pattern is painfully familiar: someone writes a “just restart the pods in this specific order” script, documents the failover procedure in a wiki page that’s already outdated, and hopes the on-call engineer at 3 AM remembers which sequence of kubectl commands won’t corrupt the data.
This is the wall that every platform team eventually hits. Kubernetes excels at managing stateless workloads—your API servers, your frontend containers, your batch jobs—because the control plane already knows everything it needs to know. A pod dies, the ReplicaSet spins up another one, traffic routes seamlessly. But the moment your application carries state, the platform’s built-in primitives fall short. Kubernetes doesn’t know that your PostgreSQL replica needs to catch up on WAL segments before becoming primary. It doesn’t understand that your Elasticsearch cluster requires a graceful rolling restart with shard rebalancing disabled. It can’t encode the decade of operational wisdom your team has accumulated about running your particular workload.
The Operator pattern exists precisely to bridge this gap. Rather than fighting Kubernetes or bolting external automation onto its edges, Operators extend the control plane itself, teaching it how to manage complex applications the same way it manages pods and services. The difference between a team that builds Operators and a team that doesn’t is the difference between a self-healing platform and a collection of artifacts that require constant human intervention.
Before diving into Kubebuilder and reconciliation loops, it’s worth understanding exactly what makes stateful workloads so different—and why static configuration will never be enough.
Why Operators Exist: The Problem with Stateful Workloads
Kubernetes excels at managing stateless applications. Deploy a web server, scale it to fifty replicas, roll out updates with zero downtime—the built-in primitives handle this elegantly. But the moment you introduce state, everything changes.

Consider what happens when you deploy PostgreSQL to Kubernetes using standard resources. You write a StatefulSet, configure a PersistentVolumeClaim, set up a Service for connectivity. The cluster starts. Then reality sets in.
Who handles the initial primary election? What happens when the primary fails at 3 AM and a replica needs promotion? How do you coordinate streaming replication setup, manage WAL archiving, or execute point-in-time recovery? Your YAML manifests sit there, static and silent, while your database burns.
The Gap Between Deployment and Operations
Static configuration captures what you want deployed. It cannot capture how to operate that deployment over time. A seasoned PostgreSQL DBA carries years of operational knowledge: when to trigger failover, how to safely perform major version upgrades, the precise sequence for adding replicas without impacting production traffic.
This operational knowledge traditionally lives in runbooks, tribal documentation, and the heads of on-call engineers. When incidents occur, humans interpret the situation and execute the appropriate response. This works until it doesn’t—humans sleep, make mistakes, and leave companies.
Compare this to a stateless web application. Kubernetes already understands the operational model: if a pod dies, create a new one. If load increases, scale horizontally. The desired state in your YAML maps directly to actions the controller knows how to take.
Stateful workloads break this mapping. “I want a highly available PostgreSQL cluster” implies dozens of operational behaviors that no built-in controller understands.
Encoding Expertise in Software
The Operator pattern emerged from a simple insight: if human operators follow consistent procedures to manage complex software, those procedures can be encoded into a program that watches the cluster and reacts.
An Operator is a custom controller paired with custom resource definitions that extend Kubernetes vocabulary. Instead of deploying raw StatefulSets, you declare a PostgresCluster resource specifying your high-level intent. The Operator translates that intent into concrete resources while continuously monitoring cluster health and taking corrective action.
The investment in building an Operator pays dividends when your operational procedures are well-defined, repeatable, and currently consuming significant human attention. For a single PostgreSQL instance in a development environment, this overhead makes no sense. For fifty production database clusters across multiple teams, encoding that expertise once and running it everywhere transforms your operational posture.
Understanding this tradeoff is essential before writing a single line of Operator code. With that context established, let’s examine the architectural components that make the pattern work.
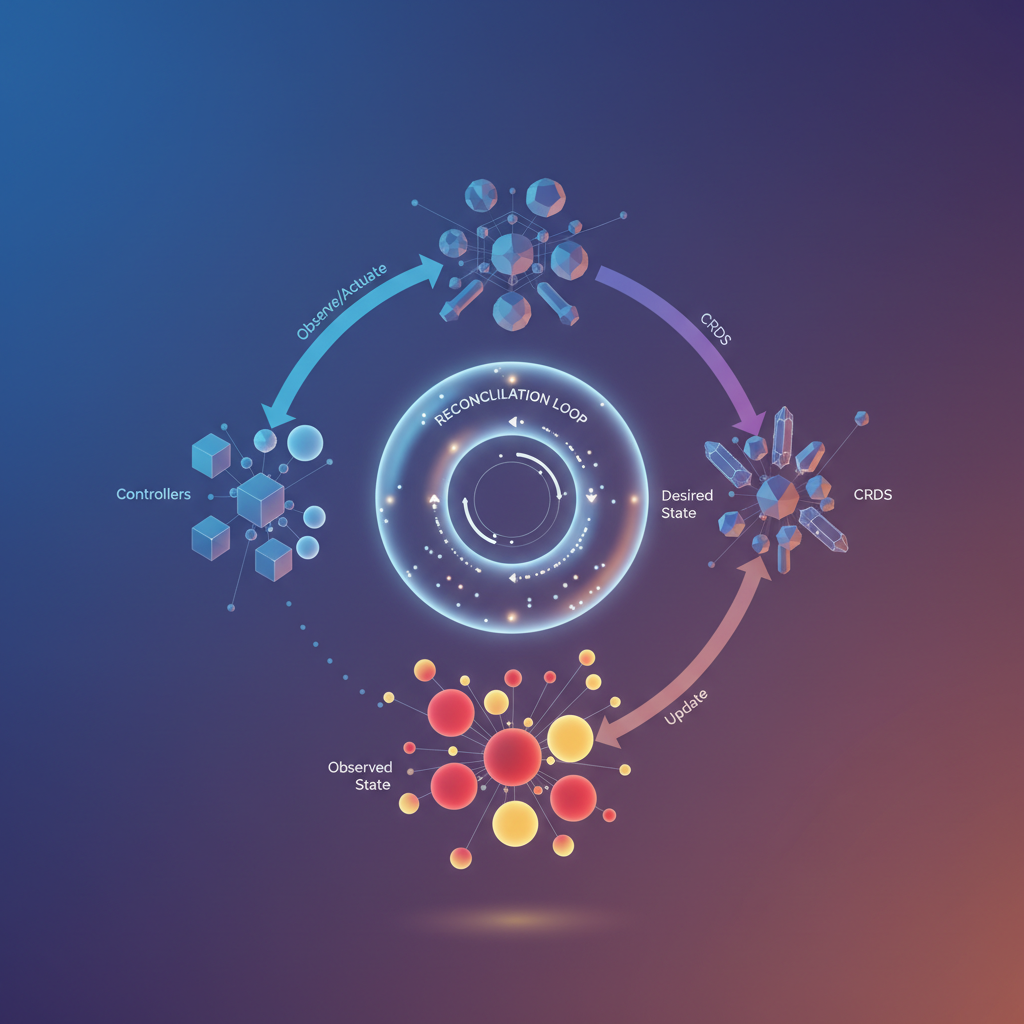
The Operator Pattern: Controllers, CRDs, and the Reconciliation Loop
Before writing a single line of operator code, you need to internalize the architectural pattern that makes operators work. This pattern—the combination of Custom Resource Definitions, controllers, and the reconciliation loop—forms the foundation of every operator in the Kubernetes ecosystem.
Extending Kubernetes with Custom Resource Definitions
Kubernetes ships with built-in resources like Pods, Deployments, and Services. These primitives handle generic workloads well, but your domain has specific concepts that don’t map cleanly to these abstractions. A PostgreSQL cluster isn’t just a StatefulSet—it’s a primary instance, replicas, backup schedules, and failover policies working together.
Custom Resource Definitions (CRDs) let you teach Kubernetes about your domain objects. When you install a CRD, you’re extending the Kubernetes API itself. Suddenly, kubectl get postgresclusters becomes a valid command. Your custom resources get the same treatment as native resources: they’re stored in etcd, validated against schemas, support RBAC policies, and integrate with the entire Kubernetes toolchain.
A CRD defines the structure of your resource—its API group, version, and the schema for its spec and status fields. The spec represents what users want (the desired state), while the status reflects what actually exists (the observed state). This separation is fundamental to how operators function.
Controllers: The Brains Behind Automation
A CRD without a controller is just data sitting in etcd. Controllers bring your custom resources to life by watching for changes and taking action.
Every controller follows a straightforward pattern: watch resources, detect changes, respond appropriately. When someone creates a PostgresCluster resource, the controller notices and provisions the necessary StatefulSets, Services, and ConfigMaps. When someone updates the replica count, the controller adjusts the underlying infrastructure to match.
Controllers communicate with the Kubernetes API server through informers—cached, event-driven watches that efficiently track resource changes without overwhelming the API server with polling requests. When a relevant event occurs (create, update, delete), the informer queues the affected resource for processing.
Pro Tip: Controllers don’t just watch your custom resources. A PostgreSQL operator also watches the Pods and StatefulSets it creates. If someone manually deletes a Pod, the controller detects this and triggers reconciliation to restore the desired state.
The Reconciliation Loop: Continuous Convergence
The reconciliation loop is where operator logic lives. Rather than responding to specific events with specific actions, the reconciler examines the current state, compares it to the desired state, and makes whatever changes are necessary to close the gap.
This design has three critical properties:
Idempotent: Running reconciliation multiple times produces the same result. If the desired state already matches reality, the reconciler does nothing. This makes operators resilient to duplicate events and safe to retry on failures.
Level-triggered: The reconciler doesn’t care how you got to the current state—it only cares what the current state is. Whether a Pod was deleted by a user, a node failure, or a spot instance termination, the reconciler responds identically: compare states, take corrective action.
Continuously converging: The reconciler doesn’t achieve the desired state in one pass and stop. External factors constantly push systems away from their desired state. The reconciliation loop runs repeatedly, nudging the system back toward correctness each time.
This “eventual consistency” model handles the messy reality of distributed systems. Network partitions, partial failures, race conditions—the reconciliation loop absorbs these disturbances and keeps driving toward the target state.
With this mental model established, let’s set up the tooling that makes building operators practical: Kubebuilder.
Setting Up Your Development Environment with Kubebuilder
Kubebuilder provides the scaffolding and tooling to build production-grade Kubernetes operators without reinventing the wheel. It generates boilerplate code that follows controller-runtime conventions, letting you focus on your domain logic rather than Kubernetes plumbing. By abstracting away the complexity of client-go and providing sensible defaults, Kubebuilder accelerates development while ensuring your operator adheres to community best practices.
Prerequisites
Before installing Kubebuilder, ensure your development environment meets the following requirements:
- Go 1.21 or later: Kubebuilder leverages modern Go features and module support. Verify your version with
go version. - Docker: Required for building container images and running integration tests.
- kubectl: Configured to communicate with a Kubernetes cluster.
- A Kubernetes cluster: kind or minikube work perfectly for local development. For kind, a simple
kind create clusterprovisions a fully functional single-node cluster in seconds.
Installing Kubebuilder
Install the Kubebuilder CLI by downloading the appropriate binary for your platform:
## Download the latest releasecurl -L -o kubebuilder "https://go.kubebuilder.io/dl/latest/$(go env GOOS)/$(go env GOARCH)"
## Make it executable and move to PATHchmod +x kubebuildersudo mv kubebuilder /usr/local/bin/
## Verify installationkubebuilder version
The version output confirms a successful installation and displays the controller-runtime and controller-tools versions bundled with your Kubebuilder release. These components work together to provide the reconciliation framework and code generation capabilities.
Creating Your First Project
Initialize a new operator project with a Go module path that matches your repository:
mkdir nginx-operator && cd nginx-operator
## Initialize the project with your domain and repokubebuilder init --domain timderzhavets.com --repo github.com/timderzhavets/nginx-operator
## Create your first API (CRD + Controller)kubebuilder create api --group apps --version v1alpha1 --kind NginxDeployment
When prompted, answer “yes” to both creating the resource and controller. Kubebuilder generates everything you need to define a custom resource and reconcile it. The --domain flag establishes your API group’s fully qualified name (apps.timderzhavets.com), while --repo ensures Go imports resolve correctly.
Understanding the Project Structure
The scaffolded project follows a clear convention that separates concerns and promotes maintainability:
nginx-operator/├── api/v1alpha1/│ ├── nginxdeployment_types.go # Your CRD struct definitions│ └── groupversion_info.go # API group registration├── internal/controller/│ └── nginxdeployment_controller.go # Reconciliation logic lives here├── config/│ ├── crd/ # Generated CRD manifests│ ├── rbac/ # Auto-generated RBAC rules│ └── manager/ # Controller manager deployment├── cmd/main.go # Entry point that wires everything together└── Makefile # Build, test, and deploy targetsapi/v1alpha1/nginxdeployment_types.go defines your custom resource’s spec and status fields. This is where you declare what users can configure and what state you track. The struct tags control JSON serialization and OpenAPI validation schema generation.
internal/controller/nginxdeployment_controller.go contains the Reconcile function—the heart of your operator. Every time Kubernetes detects a change to your custom resource, this function runs to bring actual state in line with desired state. The controller also specifies RBAC requirements through marker comments that Kubebuilder parses during manifest generation.
cmd/main.go bootstraps the controller manager, registers your controller, and starts the reconciliation loop. It configures health probes, metrics endpoints, and leader election for high availability. You rarely modify this file directly unless adding additional controllers or custom configuration.
Pro Tip: Run
make manifestsafter modifying your types. This regenerates CRD YAML files and RBAC rules based on your Go structs and controller markers.
Verifying Your Setup
Confirm everything compiles and the CRDs generate correctly:
make generate # Generate DeepCopy methodsmake manifests # Generate CRD and RBAC manifestsmake build # Compile the manager binaryThe generate target produces runtime.Object implementations required by the Kubernetes API machinery. The manifests target creates the CustomResourceDefinition YAML that you’ll install into your cluster. Running these commands after any type modification ensures your generated artifacts stay synchronized with your Go code.
You now have a complete operator skeleton with proper project conventions, generated CRDs, and a controller ready for implementation. The next step is defining what your NginxDeployment custom resource actually looks like—specifying the fields that users will configure when they create instances of your CRD.
Defining Your Custom Resource: The Nginx Deployment Example
With Kubebuilder scaffolding in place, you now define the API that users interact with. A well-designed Custom Resource Definition (CRD) serves as the contract between your operator and its consumers. The Nginx deployment example provides an ideal starting point—complex enough to demonstrate real patterns, simple enough to understand in one sitting.
Designing the Spec: What Users Declare
The spec represents desired state—what users want the operator to achieve. For an Nginx deployment operator, users care about three things: how many replicas to run, which image to use, and how to configure Nginx. Each field in your spec should map directly to a decision users need to make.
package v1
import (    metav1 "k8s.io/apimachinery/pkg/apis/meta/v1")
// NginxDeploymentSpec defines the desired state of NginxDeploymenttype NginxDeploymentSpec struct {    // Replicas is the number of Nginx pods to run    // +kubebuilder:validation:Minimum=1    // +kubebuilder:validation:Maximum=10    // +kubebuilder:default=1    Replicas int32 `json:"replicas"`
    // Image is the Nginx container image to deploy    // +kubebuilder:validation:Pattern=`^[\w.-]+(/[\w.-]+)*(:\w[\w.-]*)?$`    // +kubebuilder:default="nginx:1.25-alpine"    Image string `json:"image,omitempty"`
    // ConfigMapRef references a ConfigMap containing nginx.conf    // +optional    ConfigMapRef *string `json:"configMapRef,omitempty"`
    // Port is the container port Nginx listens on    // +kubebuilder:validation:Minimum=1    // +kubebuilder:validation:Maximum=65535    // +kubebuilder:default=80    Port int32 `json:"port,omitempty"`}
Notice the kubebuilder markers above each field. These annotations generate OpenAPI validation schemas that Kubernetes enforces at admission time. Users receive immediate feedback when submitting invalid configurations rather than discovering problems during reconciliation. The +kubebuilder:default markers ensure sensible defaults, reducing the cognitive load on users who just want basic functionality. Meanwhile, the +kubebuilder:validation markers constrain inputs to valid ranges—preventing users from requesting zero replicas or invalid port numbers before the API server even accepts the resource.
The +optional marker deserves special attention. Fields without this marker become required in the generated schema. Think carefully about which fields truly need user input versus which can default to reasonable values.
Designing the Status: What the Controller Reports
The status subresource reflects observed state—what the controller discovered about the world. Separate the status from the spec to enable optimistic concurrency; updates to status don’t conflict with user updates to spec. This separation is fundamental to the Kubernetes API design philosophy.
// NginxDeploymentStatus defines the observed state of NginxDeploymenttype NginxDeploymentStatus struct {    // ReadyReplicas is the number of pods with Ready condition    ReadyReplicas int32 `json:"readyReplicas"`
    // Conditions represent the latest available observations    // +optional    Conditions []metav1.Condition `json:"conditions,omitempty"`
    // ObservedGeneration is the most recent generation observed    ObservedGeneration int64 `json:"observedGeneration,omitempty"`}
The Conditions slice follows Kubernetes conventions established by core resources like Deployments and Pods. Standard condition types include Available, Progressing, and Degraded. Each condition carries a status (True, False, Unknown), a reason code, and a human-readable message. This standardized approach enables consistent tooling across different operators and integrates naturally with kubectl and monitoring systems.
The ObservedGeneration field lets clients determine whether the controller has processed their latest changes. When a user updates the spec, Kubernetes increments .metadata.generation. Your controller copies this value to ObservedGeneration after processing. Clients compare these values to detect pending changes.
Pro Tip: Always include
ObservedGenerationin your status. Without it, clients cannot distinguish between “the controller hasn’t seen my change yet” and “the controller processed my change but nothing happened.”
Adding Kubebuilder Markers for Schema Generation
Complete your type definition with root markers that configure CRD generation:
// +kubebuilder:object:root=true// +kubebuilder:subresource:status// +kubebuilder:printcolumn:name="Replicas",type=integer,JSONPath=`.spec.replicas`// +kubebuilder:printcolumn:name="Ready",type=integer,JSONPath=`.status.readyReplicas`// +kubebuilder:printcolumn:name="Age",type=date,JSONPath=`.metadata.creationTimestamp`
// NginxDeployment is the Schema for the nginxdeployments APItype NginxDeployment struct {    metav1.TypeMeta   `json:",inline"`    metav1.ObjectMeta `json:"metadata,omitempty"`
    Spec   NginxDeploymentSpec   `json:"spec,omitempty"`    Status NginxDeploymentStatus `json:"status,omitempty"`}
The +kubebuilder:subresource:status marker enables the status subresource, requiring status updates through a dedicated endpoint. This prevents users from accidentally modifying status fields and ensures the controller maintains exclusive ownership of observed state. The +kubebuilder:printcolumn markers define what kubectl get nginxdeployments displays, giving users immediate visibility into resource health without requiring describe commands or JSON parsing.
Run make manifests to generate the CRD YAML from these Go types. Kubebuilder produces a complete OpenAPI v3 schema with all validation rules embedded. Inspect the generated YAML in config/crd/bases/ to understand exactly what gets installed in your cluster.
Your CRD now provides a clean, validated API surface. Users declare their intent through spec fields, receive feedback through status fields, and get immediate validation errors for invalid inputs. With the API contract established, you can implement the reconciliation logic that transforms desired state into reality.
Implementing the Reconciliation Logic
The reconciliation loop is where your operator comes to life. This function runs every time Kubernetes detects a change to your custom resource or any resources it owns. Writing robust reconciliation logic means handling every edge case gracefully—from resources that don’t exist yet to partial failures that require retry.
The reconciliation pattern follows a declarative model: you describe the desired state, compare it to the actual state, and make changes to bridge the gap. This approach ensures your operator remains idempotent—running it multiple times with the same input produces the same result.
Let’s build out the complete Reconcile function for our NginxDeployment operator.
Fetching the Custom Resource
Every reconciliation starts by fetching the custom resource that triggered it. The reconciler receives a Request containing the namespace and name of the resource. This is your entry point into understanding what state the user wants.
func (r *NginxDeploymentReconciler) Reconcile(ctx context.Context, req ctrl.Request) (ctrl.Result, error) {    log := log.FromContext(ctx)
    // Fetch the NginxDeployment instance    nginxDeployment := &webv1.NginxDeployment{}    err := r.Get(ctx, req.NamespacedName, nginxDeployment)    if err != nil {        if apierrors.IsNotFound(err) {            // Resource was deleted before reconciliation - nothing to do            log.Info("NginxDeployment resource not found, skipping reconciliation")            return ctrl.Result{}, nil        }        // Error reading the object - requeue the request        log.Error(err, "Failed to get NginxDeployment")        return ctrl.Result{}, err    }
    // Resource exists, proceed with reconciliation    log.Info("Reconciling NginxDeployment", "name", nginxDeployment.Name)
The IsNotFound check prevents your operator from panicking when a resource gets deleted between the time Kubernetes queues the reconciliation event and when your code runs. This race condition happens constantly in production—always handle it. The window between event generation and reconciliation execution can span seconds or even minutes under heavy cluster load.
Creating Child Resources with Owner References
Your operator creates and manages child resources like Deployments and Services. Owner references ensure Kubernetes garbage collects these resources when the parent NginxDeployment is deleted. Without owner references, you’d leave orphaned resources cluttering the cluster.
    // Define the desired Deployment    deployment := &appsv1.Deployment{        ObjectMeta: metav1.ObjectMeta{            Name:      nginxDeployment.Name + "-deployment",            Namespace: nginxDeployment.Namespace,        },        Spec: appsv1.DeploymentSpec{            Replicas: &nginxDeployment.Spec.Replicas,            Selector: &metav1.LabelSelector{                MatchLabels: map[string]string{"app": nginxDeployment.Name},            },            Template: corev1.PodTemplateSpec{                ObjectMeta: metav1.ObjectMeta{                    Labels: map[string]string{"app": nginxDeployment.Name},                },                Spec: corev1.PodSpec{                    Containers: []corev1.Container{{                        Name:  "nginx",                        Image: "nginx:" + nginxDeployment.Spec.Version,                        Ports: []corev1.ContainerPort{{ContainerPort: 80}},                    }},                },            },        },    }
    // Set owner reference for garbage collection    if err := controllerutil.SetControllerReference(nginxDeployment, deployment, r.Scheme); err != nil {        log.Error(err, "Failed to set owner reference on Deployment")        return ctrl.Result{}, err    }
Pro Tip: Always use
SetControllerReferencerather than manually constructing owner references. It handles the schema details and ensures only one controller owns each resource. Attempting to set multiple controller references on a resource will fail, which prevents conflicting operators from fighting over the same child resources.
The owner reference establishes a parent-child relationship that Kubernetes uses for two purposes: garbage collection when the parent is deleted, and triggering reconciliation when child resources change. When your Deployment’s status updates, Kubernetes automatically queues a reconciliation for the owning NginxDeployment.
Create-or-Update Pattern
Rather than checking if a resource exists before creating it, use a pattern that handles both cases. This approach avoids race conditions where another process might create the resource between your check and creation attempt.
// Create or update the Deployment foundDeployment := &appsv1.Deployment{} err = r.Get(ctx, types.NamespacedName{Name: deployment.Name, Namespace: deployment.Namespace}, foundDeployment) if err != nil && apierrors.IsNotFound(err) { log.Info("Creating Deployment", "name", deployment.Name) if err = r.Create(ctx, deployment); err != nil { log.Error(err, "Failed to create Deployment") return ctrl.Result{}, err } } else if err != nil { return ctrl.Result{}, err } else { // Deployment exists - update if spec changed if *foundDeployment.Spec.Replicas != nginxDeployment.Spec.Replicas { foundDeployment.Spec.Replicas = &nginxDeployment.Spec.Replicas log.Info("Updating Deployment replicas", "replicas", nginxDeployment.Spec.Replicas) if err = r.Update(ctx, foundDeployment); err != nil { log.Error(err, "Failed to update Deployment") return ctrl.Result{}, err } } }For more complex scenarios, controller-runtime provides CreateOrUpdate and CreateOrPatch helpers that handle the get-modify-update cycle atomically. These utilities accept a mutate function that specifies how to modify the resource, reducing boilerplate and potential for errors.
Updating Status and Requeue Strategies
After reconciling child resources, update the custom resource’s status to reflect the current state. This gives users visibility into what the operator is doing and enables tooling like kubectl wait to monitor progress.
    // Update status    nginxDeployment.Status.AvailableReplicas = foundDeployment.Status.AvailableReplicas    nginxDeployment.Status.Ready = foundDeployment.Status.AvailableReplicas == nginxDeployment.Spec.Replicas
    if err := r.Status().Update(ctx, nginxDeployment); err != nil {        log.Error(err, "Failed to update NginxDeployment status")        return ctrl.Result{}, err    }
    // Requeue after 30 seconds to check deployment health    if !nginxDeployment.Status.Ready {        return ctrl.Result{RequeueAfter: 30 * time.Second}, nil    }
    return ctrl.Result{}, nil}
The return value controls when Kubernetes runs your reconciler again:
ctrl.Result{}, nil— reconciliation succeeded, run again only when the resource changesctrl.Result{}, err— reconciliation failed, requeue immediately with exponential backoffctrl.Result{RequeueAfter: duration}— reconciliation succeeded but check again after a specific intervalctrl.Result{Requeue: true}— requeue immediately without backoff
Use RequeueAfter for polling scenarios where you’re waiting for external state to converge. Return errors only for transient failures that exponential backoff can resolve—never for permanent errors like invalid configuration. Permanent errors should update the status with a failure condition and return success to prevent infinite retry loops.
Consider the backoff implications carefully. The default exponential backoff starts at 5ms and caps at 1000 seconds. For failures that need immediate retry, this works well. For failures that need a fixed delay, use RequeueAfter to maintain predictable timing.
Pro Tip: Status updates use a separate API client (
r.Status().Update) because Kubernetes treats status as a subresource with different RBAC permissions. This prevents your operator from needing full write access to custom resources and follows the principle of least privilege.
With your reconciliation logic complete, you need to verify it handles all edge cases correctly. Testing operators requires a different approach than typical unit tests—you need a real Kubernetes API server to exercise the controller logic.
Testing and Debugging Your Operator
A production-ready operator requires thorough testing before it manages real workloads. The Kubernetes ecosystem provides excellent tooling for testing controllers at multiple levels—from unit tests that verify individual functions to integration tests that exercise the full reconciliation loop against a real API server. Investing in a comprehensive test strategy pays dividends as your operator evolves, catching regressions early and giving you confidence to refactor safely.
Integration Testing with envtest
The controller-runtime library includes envtest, a package that spins up a local API server and etcd instance without requiring a full Kubernetes cluster. This gives you a realistic environment to test your reconciliation logic while keeping test execution fast—typically under a second for the environment setup.
First, configure your test suite to use envtest:
package controller
import (    "path/filepath"    "testing"
    . "github.com/onsi/ginkgo/v2"    . "github.com/onsi/gomega"    "k8s.io/client-go/kubernetes/scheme"    "sigs.k8s.io/controller-runtime/pkg/client"    "sigs.k8s.io/controller-runtime/pkg/envtest"
    webappv1 "github.com/example/nginx-operator/api/v1")
var testEnv *envtest.Environmentvar k8sClient client.Client
func TestControllers(t *testing.T) {    RegisterFailHandler(Fail)    RunSpecs(t, "Controller Suite")}
var _ = BeforeSuite(func() {    testEnv = &envtest.Environment{        CRDDirectoryPaths: []string{            filepath.Join("..", "..", "config", "crd", "bases"),        },    }
    cfg, err := testEnv.Start()    Expect(err).NotTo(HaveOccurred())
    err = webappv1.AddToScheme(scheme.Scheme)    Expect(err).NotTo(HaveOccurred())
    k8sClient, err = client.New(cfg, client.Options{Scheme: scheme.Scheme})    Expect(err).NotTo(HaveOccurred())})
var _ = AfterSuite(func() {    testEnv.Stop()})
Write tests that create custom resources and verify your controller responds correctly. The Ginkgo/Gomega testing framework provides expressive assertions and the Eventually helper handles the asynchronous nature of controller reconciliation:
var _ = Describe("NginxDeployment Controller", func() {    It("should create a Deployment when NginxDeployment is created", func() {        ctx := context.Background()        nginx := &webappv1.NginxDeployment{            ObjectMeta: metav1.ObjectMeta{                Name:      "test-nginx",                Namespace: "default",            },            Spec: webappv1.NginxDeploymentSpec{                Replicas: 3,                Image:    "nginx:1.25",            },        }
        Expect(k8sClient.Create(ctx, nginx)).To(Succeed())
        Eventually(func() bool {            var deployment appsv1.Deployment            err := k8sClient.Get(ctx, types.NamespacedName{                Name:      "test-nginx",                Namespace: "default",            }, &deployment)            return err == nil && *deployment.Spec.Replicas == 3        }, time.Second*10, time.Millisecond*250).Should(BeTrue())    })})
Note that envtest does not run Kubernetes controllers like the Deployment controller. Your tests verify that your operator creates the correct resources with the expected specifications, but child resources won’t spawn pods or update status. For end-to-end validation of the full resource lifecycle, you need a real cluster.
Local Development with kind
While envtest works well for automated testing, you’ll want a full cluster during active development. kind (Kubernetes in Docker) provides a lightweight local cluster that runs entirely in containers on your workstation:
kind create cluster --name operator-devmake install # Install CRDsmake run # Run controller locally against the clusterRunning locally lets you add breakpoints, print debug statements, and iterate quickly without rebuilding container images. Your IDE’s debugger attaches directly to the process, making it straightforward to step through reconciliation logic and inspect the state at each point.
For more realistic testing, you can also deploy your operator as a container within the kind cluster. Load your locally-built image directly into kind to avoid pushing to a registry:
docker build -t nginx-operator:dev .kind load docker-image nginx-operator:dev --name operator-devmake deploy IMG=nginx-operator:devCommon Pitfalls to Avoid
Infinite reconciliation loops occur when your controller updates a resource in a way that triggers another reconciliation. Each update increments the resource version, which the watch mechanism detects as a change. Always check if an update is necessary before making it:
if !equality.Semantic.DeepEqual(existingDeployment.Spec, desiredDeployment.Spec) { existingDeployment.Spec = desiredDeployment.Spec if err := r.Update(ctx, existingDeployment); err != nil { return ctrl.Result{}, err }}Missing RBAC permissions cause cryptic “forbidden” errors. Your controller needs explicit permissions for every resource it touches—not just the obvious ones like Deployments, but also any resources you read, list, or watch. Watch for error logs mentioning authorization failures and add the corresponding //+kubebuilder:rbac markers. Run make manifests after adding markers to regenerate the ClusterRole.
Owner reference cycles happen when two resources reference each other as owners, preventing garbage collection. Owner references should form a directed acyclic graph—parent resources own children, never the reverse. The garbage collector will leave orphaned resources indefinitely if it detects a cycle.
Status update conflicts arise when multiple reconciliation goroutines attempt to update the same resource simultaneously. Always fetch the latest version before updating status, and handle conflict errors by requeuing rather than failing.
Pro Tip: Enable verbose logging during development with
--zap-log-level=debug. The controller-runtime logger outputs every reconciliation trigger and API call, making it straightforward to trace unexpected behavior. You can also enable the--zap-devel=trueflag for human-readable output instead of JSON.
With your operator thoroughly tested locally, you’re ready to package it for production deployment.
Packaging and Deploying to Production
With your operator tested and debugged, it’s time to package it for production deployment. Kubebuilder generates everything you need—container images, manifests, and RBAC configurations—through a standardized build process that integrates seamlessly with modern CI/CD pipelines.
Building the Container Image
Kubebuilder projects include a Makefile that handles the entire build pipeline. Build and push your operator image:
## Build the container imagemake docker-build IMG=ghcr.io/your-org/nginx-operator:v1.0.0
## Push to your container registrymake docker-push IMG=ghcr.io/your-org/nginx-operator:v1.0.0
The generated Dockerfile uses a multi-stage build that compiles your Go code and produces a minimal runtime image based on gcr.io/distroless/static. This results in images under 50MB with a reduced attack surface. The distroless base contains no shell or package manager, limiting potential exploit vectors in your production environment.
For air-gapped environments or registries requiring authentication, configure your Docker credentials before pushing. The Makefile respects standard Docker configuration, making integration with private registries straightforward.
Generating and Applying Manifests
Deploy your operator with a single command:
make deploy IMG=ghcr.io/your-org/nginx-operator:v1.0.0This command applies all necessary resources in order: CRDs, the operator namespace, RBAC roles and bindings, and the controller deployment. For production environments, you’ll want to inspect and version-control these manifests:
## Generate manifests without applyingmake manifests
## Export deployment manifests to a directorykustomize build config/default > deploy/operator.yaml
The generated RBAC follows least-privilege principles. Review config/rbac/role.yaml to understand what permissions your operator requests:
apiVersion: rbac.authorization.k8s.io/v1kind: ClusterRolemetadata: name: nginx-operator-manager-rolerules: - apiGroups: ["apps"] resources: ["deployments"] verbs: ["create", "delete", "get", "list", "patch", "update", "watch"] - apiGroups: ["webapp.example.com"] resources: ["nginxdeployments"] verbs: ["create", "delete", "get", "list", "patch", "update", "watch"] - apiGroups: ["webapp.example.com"] resources: ["nginxdeployments/status"] verbs: ["get", "patch", "update"]Security teams often require detailed RBAC audits before production approval. The clear separation between resource types and verbs in this format simplifies compliance reviews and makes it easy to identify exactly what cluster access your operator requires.
OLM Distribution Considerations
For distributing your operator to other teams or external users, the Operator Lifecycle Manager provides a standardized packaging format. OLM handles operator installation, upgrades, and dependency resolution across cluster fleets. Generate an OLM bundle:
make bundle IMG=ghcr.io/your-org/nginx-operator:v1.0.0make bundle-build BUNDLE_IMG=ghcr.io/your-org/nginx-operator-bundle:v1.0.0make bundle-push BUNDLE_IMG=ghcr.io/your-org/nginx-operator-bundle:v1.0.0OLM bundles include a ClusterServiceVersion (CSV) that describes your operator’s capabilities, dependencies, and upgrade paths. Edit config/manifests/bases/nginx-operator.clusterserviceversion.yaml to add descriptions, icons, and maintainer information before publishing to OperatorHub. The CSV also defines installation modes—whether your operator supports cluster-wide installation, single-namespace deployment, or both.
Pro Tip: Run
operator-sdk scorecard bundle/against your bundle to validate it meets OLM best practices before submission. The scorecard checks for common issues like missing API descriptions, improper owned CRD declarations, and lifecycle hook problems.
Consider semantic versioning for your operator releases. OLM uses version information to determine valid upgrade paths, so establishing a clear versioning strategy from the start prevents upgrade complications as your operator evolves.
With your operator packaged and deployed, you’ve completed the full development lifecycle—from understanding the operator pattern to shipping production-ready automation. The patterns you’ve learned here scale to complex stateful applications: databases, message queues, and distributed systems that require sophisticated lifecycle management beyond what Kubernetes provides natively.
Key Takeaways
- Start with Kubebuilder’s scaffolding to enforce best practices—don’t build the controller machinery from scratch
- Design your CRD’s spec as the user-facing contract and status as your controller’s communication channel back to users
- Make your Reconcile function idempotent: assume it can be called at any time for any reason, and always drive toward desired state
- Use owner references on all child resources so garbage collection happens automatically when the parent CR is deleted
- Test with envtest in CI and kind clusters locally before trusting your Operator with production workloads